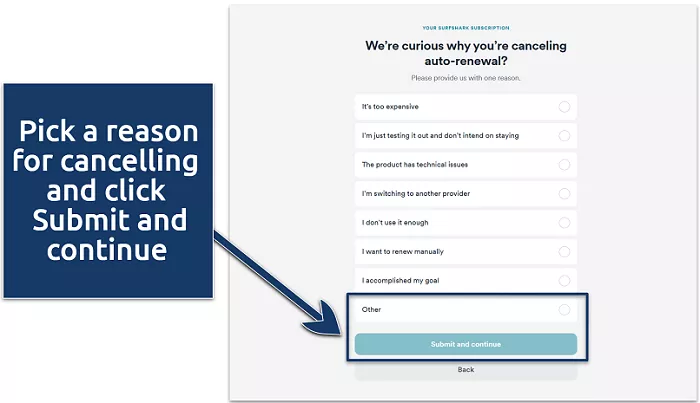
Managing your Surfshark subscription is essential to ensure that payments align with your preferences. If you’re looking to prevent the automatic renewal of your Surfshark VPN service, this comprehensive guide will walk you through the necessary steps.
Surfshark is a popular VPN service that offers robust privacy and security features. By default, Surfshark subscriptions are set to auto-renew, ensuring uninterrupted service. However, there might be instances where you wish to disable this auto-renewal—for example, if you’re considering switching to a different VPN provider or no longer require VPN services. It’s important to note that canceling auto-renewal will stop future payments, but you’ll retain access to Surfshark until the end of your current billing cycle.
What is Surfshark’s Auto-Renewal Policy
Auto-renewal is a standard practice for many subscription-based services, including Surfshark. It ensures that your VPN protection continues without interruption. However, if you decide that you no longer wish to continue with the service, it’s crucial to disable this feature to prevent unexpected charges.
Steps to Cancel Surfshark Auto-Renewal
The process to stop Surfshark’s auto-renewal varies depending on how you initially subscribed. Below are the methods tailored to different subscription sources:
1. Subscribed Directly Through Surfshark’s Website
If you purchased your Surfshark subscription directly from their official website, follow these steps:
Log In to Your Account:
-
- Visit the Surfshark website and click on the “Log in” button located at the top right corner.
- Enter your credentials to access your account dashboard.
Navigate to the Subscription Management Page:
-
- Once logged in, click on your account name or profile icon in the top right corner.
- Select the “Subscription” tab from the dropdown menu.
Disable Auto-Renewal:
-
- In the “Subscription” section, locate the “Auto-renewal” settings.
- Click on “Cancel auto-renewal” to stop future payments.
- Confirm your decision when prompted.
2. Subscribed via Google Play Store (Android Devices)
For subscriptions made through the Google Play Store:
Open Google Play Store:
-
- On your Android device, launch the Google Play Store app.
Access Subscriptions:
-
- Tap on the profile icon in the top right corner.
- Select “Payments and subscriptions.”
- Tap on “Subscriptions.”
Locate and Cancel Surfshark Subscription:
-
- Find “Surfshark” in your list of subscriptions.
- Tap on it, then select “Cancel subscription.”
- Follow the on-screen instructions to complete the cancellation.
3. Subscribed via Apple App Store (iOS Devices)
For subscriptions purchased through the Apple App Store:
Open Settings:
-
- On your iOS device, open the “Settings” app.
Access Apple ID Settings:
-
- Tap on your name at the top of the settings menu.
- Select “Subscriptions.”
Manage Surfshark Subscription:
-
- Find and tap on “Surfshark” under your active subscriptions.
- Tap “Cancel Subscription” and confirm your choice.
4. Subscribed via Amazon Appstore
For subscriptions obtained through the Amazon Appstore:
Log In to Amazon Account:
-
- Visit the Amazon website and log in to your account.
Navigate to Memberships & Subscriptions:
-
- Hover over “Account & Lists” and select “Memberships & Subscriptions.”
Cancel Surfshark Subscription:
-
- Locate “Surfshark” in your list of subscriptions.
- Click on it and follow the prompts to cancel.
5. Subscribed via Other Payment Providers
If you used a different payment method, such as PayPal or a third-party service:
Contact Surfshark Support:
-
- Visit Surfshark’s support page.
- Use the live chat feature to communicate with a customer support representative.
- Request the cancellation of your subscription and auto-renewal.
Important Considerations
- Refund Policy: Surfshark offers a 30-day money-back guarantee. If you cancel within this period, you may be eligible for a refund. Beyond 30 days, refunds are generally not provided.
- Service Access Post-Cancellation: Disabling auto-renewal stops future payments but does not immediately terminate your access. You’ll retain service until the end of your current billing cycle.
- Third-Party Purchases: Subscriptions obtained through third-party vendors (like app stores or resellers) must be managed through those platforms.
Conclusion
Managing your Surfshark subscription ensures that your VPN service aligns with your current needs and prevents unexpected charges. By following the appropriate steps based on your subscription method, you can effectively disable auto-renewal and maintain control over your payments. Always

